How to Clear Cache in Windows 11 (Every Cache Type)
System, browser, Store and DNS caches — all in one guide
To clear cache in Windows 11, open Settings with the Windows key + I, go to System, then Storage, click Temporary files, select the categories you want to remove and press Remove files. For browser cache, press Ctrl+Shift+Delete inside Chrome, Edge or Firefox; for the Microsoft Store cache, run wsreset.exe; and for the DNS cache, type ipconfig /flushdns in Command Prompt. Those four steps cover every major cache type on a Windows 11 PC.
Caches exist to make your computer faster, but over months they quietly grow into gigabytes of temporary data and occasionally cause glitches of their own. In this guide, we'll walk through each cache type one by one with exact steps — system, browser, Microsoft Store and DNS — and finish with a way to clear all of them in a single click.
Key Takeaways
- Clearing cache in Windows 11 is completely safe; deleted files are rebuilt automatically by the system and apps as needed.
- System temporary files and Windows Update leftovers are best cleared via Settings > System > Storage > Temporary files.
- The universal shortcut 'Ctrl+Shift+Delete' opens the cache-clearing dialog across Chrome, Edge, and Firefox.
- Running 'wsreset.exe' in the Run dialog quickly resets the Microsoft Store cache when downloads get stuck or pages fail to load.
- Flushing the DNS cache with 'ipconfig /flushdns' fixes stale domain records and website loading errors instantly.
Clear every Windows 11 cache with Disk Mop
DiskMop automatically scans, identifies, and safely cleans hidden caches, app leftovers, and system junk.
Windows 11 cache types, locations, and cleanup procedures
| Cache Type | Location / Shortcut | Typical Size | Safety Level | Why Clear It |
|---|---|---|---|---|
| System Temporary Files | Settings > Storage or %temp% | 2 GB – 15 GB | Completely Safe | Reclaim drive space |
| Web Browser Cache | Ctrl + Shift + Delete (in-browser) | 1 GB – 5 GB | Completely Safe | Fix broken website layouts and bloated profiles |
| Microsoft Store Cache | wsreset.exe (Run dialog) | 100 MB – 500 MB | Completely Safe | Fix stuck downloads and launching crashes |
| DNS Resolver Cache | ipconfig /flushdns (Command Prompt) | < 10 MB | Completely Safe | Resolve website connection and DNS resolution errors |
| Thumbnail Cache | Disk Cleanup (cleanmgr) | 500 MB – 2 GB | Completely Safe | Fix corrupted icon previews and slow folder loading |
Why Windows 11 Caches Pile Up Over Time
A cache is temporary data that Windows and your applications store so repeated tasks finish faster. Your browser saves images and scripts from websites, Windows keeps thumbnails, update files and DNS records, and the Microsoft Store maintains its own download cache. All of this is normal and, most of the time, genuinely useful.
The problem is accumulation. Windows Update leftovers, Delivery Optimization files and application caches can quietly consume many gigabytes of disk space. Stale cache entries also cause real problems: web pages that refuse to update, a Microsoft Store that will not load, or a website that suddenly seems unreachable after it moved to a new server.
The good news is that clearing the cache is safe. Deleted cache data is rebuilt automatically as you use your PC; the only side effect is that some pages and apps load slightly slower the first time afterwards. Low disk space, misbehaving apps and odd network errors are all good reasons to reach for a cache cleanup.
Clear Temporary and System Cache from Settings
The easiest way to clear the system cache in Windows 11 is the Settings app. Press the Windows key + I to open Settings, choose System, then Storage, and click Temporary files. Windows lists categories such as Windows Update Cleanup, Delivery Optimization Files, thumbnails and temporary files, along with the space each one occupies. Tick what you want to delete and press Remove files. One warning: the Downloads category deletes everything in your Downloads folder, so leave it unticked unless you are certain.
On the same Storage page, the Cleanup recommendations section is worth a visit. Windows 11 suggests large or long-unused files and apps you no longer use, which makes it a quick win when space is tight. You can also enable Storage Sense here so Windows deletes temporary files automatically on a schedule.
The classic Disk Cleanup tool still exists as well: search for Disk Cleanup in the Start menu, run it, and use the option to clean up system files to remove old update leftovers. These built-in tools handle system temp files well — but they never touch your browser, Store or DNS caches, which need their own steps.
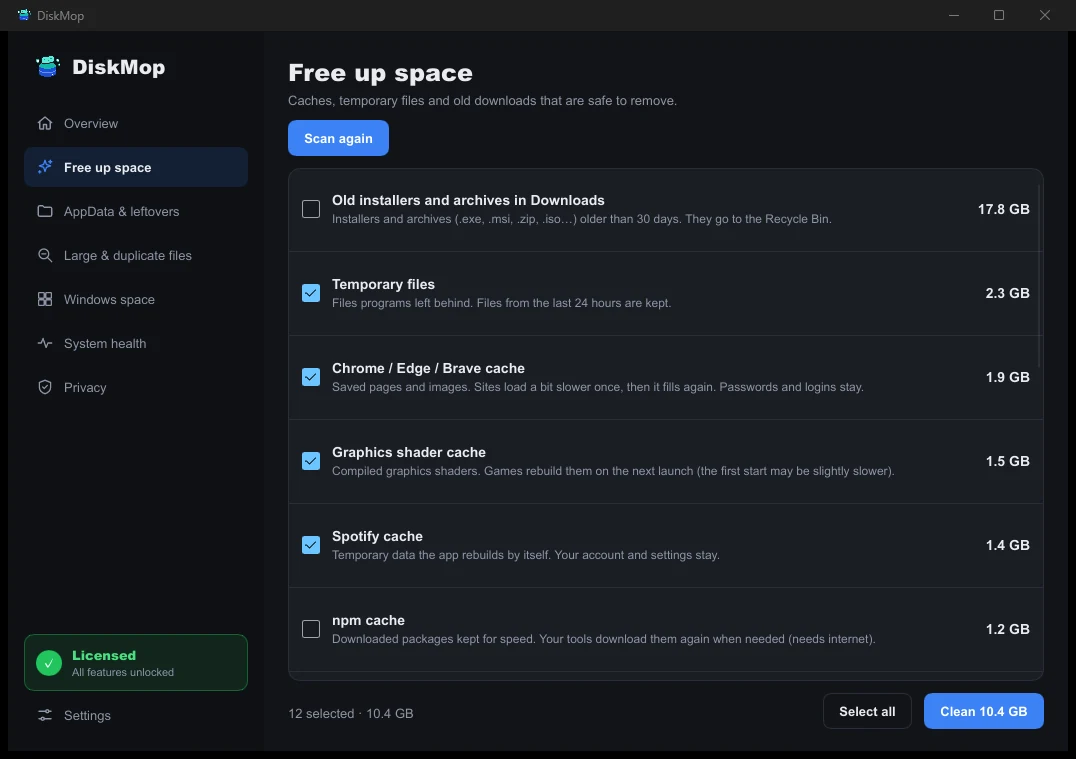
How DiskMop Solves This: Cache
Safely clean system and app cache files. Gain gigabytes of space.
Clear Browser Cache in Chrome, Edge and Firefox
The fastest route is the same in all three browsers: press Ctrl+Shift+Delete to open the browsing data dialog directly. Set the time range to all time, tick cached images and files, and confirm. Pages that will not update, broken site layouts and a browser profile that has ballooned in size are the classic signs that this cleanup is overdue.
If you prefer the menus: in Chrome, open the three-dot menu, go to Settings, then Privacy and security, and use the option for deleting browsing data. In Edge, the equivalent lives under Settings in the Privacy, search, and services section. In Firefox, go to Settings, then Privacy and Security, find Cookies and Site Data and click Clear Data. Leave cookies and passwords unticked if you want to stay signed in to your accounts.
If repeating this in every browser sounds tedious, Disk Mop's Browser Cache Cleaner clears Chrome, Firefox, Edge and Safari caches from one screen. Instead of digging through three different settings menus, you handle every browser in a single pass.
Reset the Microsoft Store Cache with WSReset
When the Microsoft Store will not open, downloads get stuck or store pages stay blank, the culprit is usually the Store's own cache. It is completely separate from your browser cache, and Windows includes a dedicated reset tool for it.
Press the Windows key + R to open the Run dialog, type wsreset.exe and press Enter. An empty black window appears; wait a few seconds. The window then closes on its own and the Microsoft Store opens automatically, which means the cache has been reset. The process does not touch your installed apps or personal files.
If the Store still misbehaves, go to Settings, then Apps, then Installed apps, find Microsoft Store and open its advanced options. Try Repair first, which keeps your data in place; use Reset only if the problem persists.
Flush the DNS Cache from Command Prompt
Windows stores the results of DNS lookups — the translation of website names into server addresses — so pages you revisit load faster. When a site moves to a new server or you change VPN and DNS settings, those saved records go stale. Errors saying a site cannot be reached are often caused by exactly this.
To flush the DNS cache in Windows 11, type cmd in the Start menu, open Command Prompt and run ipconfig /flushdns. You will see a confirmation that the DNS Resolver Cache was successfully flushed. The same command works in PowerShell and Windows Terminal, and no restart is needed. If you are curious, ipconfig /displaydns lists the currently cached entries before you clear them.
If you would rather skip the terminal, Disk Mop's DNS Cache Cleaner flushes the DNS cache with a single click. It is a handy shortcut when network hiccups are frequent or command lines simply are not your thing.
Clear Every Cache in One Click
Every method above works, but notice the pattern: four cache types, four different places, and none of them remind you to come back. Most people only clear caches when the disk is already full or something has broken — which is precisely the moment cleanup helps the least.
Disk Mop condenses the whole routine into one click. Its Speed Up feature cleans the system cache, browser caches, old downloads and the recycle bin in a single pass, while the dedicated Cache Cleaner, Browser Cache Cleaner and DNS Cache Cleaner cover each type individually when you want finer control. Scheduled Cleanup runs everything weekly or monthly automatically, and the System Health Score shows at a glance when your PC needs attention.
Disk Mop is free to download with limited features, and the Pro version is a one-time $19.90 payment with a lifetime license — no subscription. The app runs on Windows 10 and 11 as well as macOS.
Frequently Asked Questions
Is it safe to clear cache in Windows 11?
Yes, clearing cache files is completely safe. Cache files are temporary working data; the operating system and installed apps will rebuild fresh copies as needed.
Does clearing cache improve PC performance?
Yes. Deleting bloated browser caches, corrupt thumbnail databases, and massive Windows Update temporary files frees up drive capacity and resolves strange lag and freeze issues.
Will clearing my browser cache delete my passwords?
No, as long as you do not check the 'Cookies and other site data' or 'Passwords' checkboxes. Selecting only 'Cached images and files' keeps your logins intact.
How often should I clear cache on Windows 11?
Once a month is generally sufficient, or immediately whenever you experience unexplained disk fullness, network connection glitches, or crashing apps.
Verdict
Clearing cache in Windows 11 comes down to four core moves: remove temporary files through Settings, clear browser caches with Ctrl+Shift+Delete, reset the Microsoft Store cache with wsreset.exe, and flush the DNS cache with ipconfig /flushdns. Done regularly, these steps reclaim real disk space and quietly prevent a whole class of everyday glitches.
Disk Mop brings all four into a single app. The Speed Up button turns the entire routine into one click, and Scheduled Cleanup makes it automatic from then on. If you would rather never think about caches again, Disk Mop is the simplest way to keep Windows 11 clean and fast.
Clear every Windows 11 cache with Disk Mop
DiskMop automatically scans, identifies, and safely cleans hidden caches, app leftovers, and system junk.